AWS
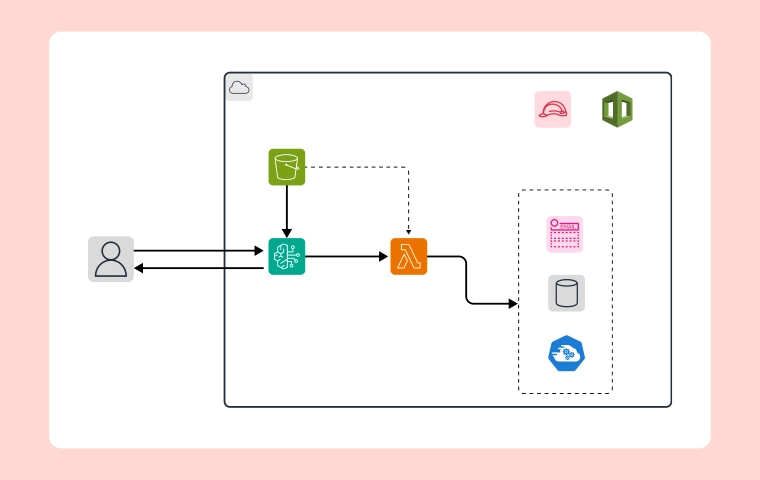
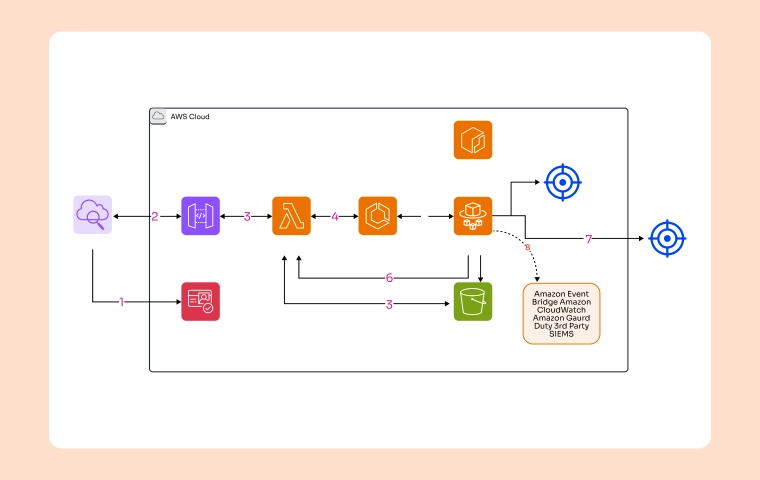
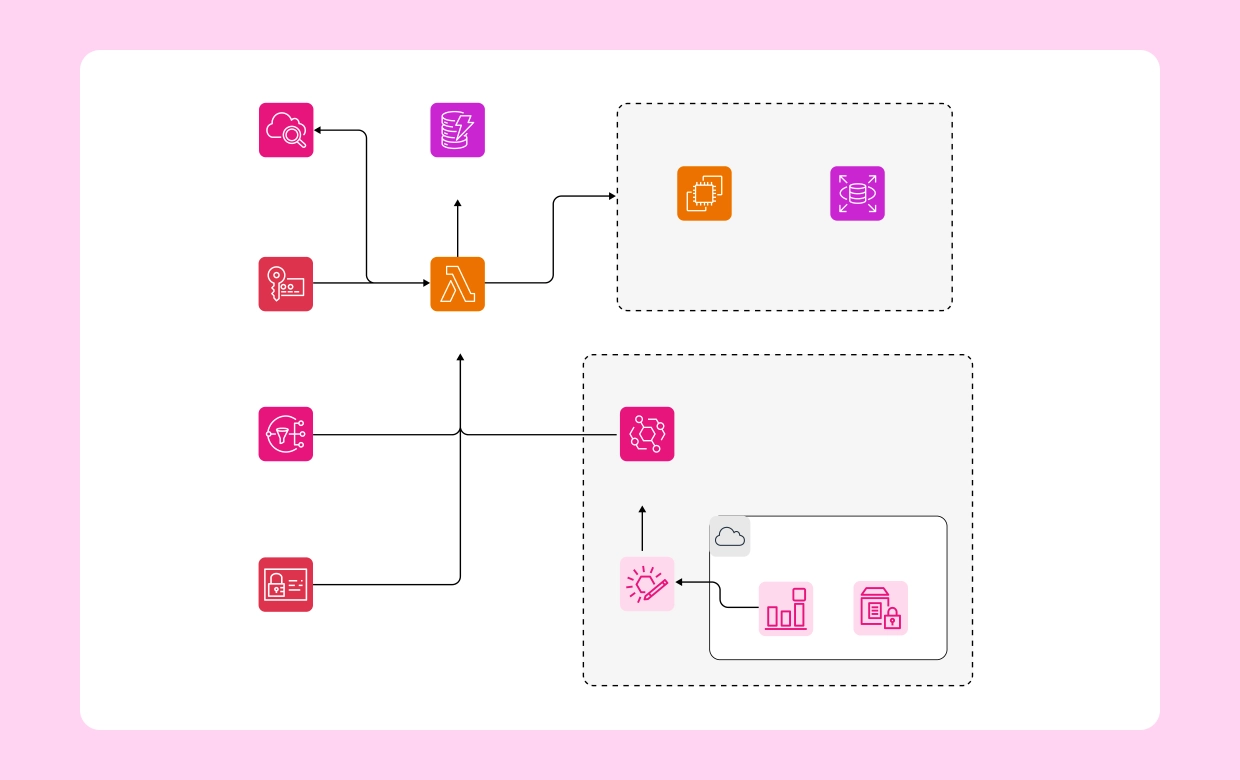
AWS Instance Scheduler Architecture Designed with Cloudairy Cloudchart

AI Workspace for Diagrams & Collaboration
Get your team started in minutes
Sign up with your work email for seamless collaboration.
Managing cloud costs efficiently is crucial for businesses leveraging AWS resources. One effective way to optimize costs is by automating the start and stop times of your EC2 instances using AWS Instance Scheduler. This comprehensive blog will walk you through the process of setting up an AWS Instance Scheduler to help you manage your resources efficiently.
.webp)
Before beginning the setup of the AWS Instance Scheduler, ensure you have the following
AWS Account: An AWS account with appropriate permissions to create and manage resources.
AWS CLI: Installed and configured on your local machine.
AWS provides a CloudFormation template to simplify the deployment of the Instance Scheduler. Follow these steps:
Sign In: Sign in to the AWS Management Console.
Navigate to CloudFormation: Under the "Find Services" search box, type "CloudFormation" and select the service.
Create a New Stac
Create Stack: Click on "Create Stack" and select "With new
resources (standard)."
Specify Template:
Choose "Amazon S3 URL." and enter the URL for the Instance Scheduler CloudFormation template. You can find the latest URL in the AWS Instance Scheduler documentation.
.webp)
Stack Name: Provide a stack name, such as InstanceSchedulerStack.
Parameters: Fill in the required parameters:
TagName: A tag used to identify instances to be scheduled (e.g., Schedule).
TagValue: The value of the tag used to identify instances (e.g.,
OfficeHours).
DefaultTimezone: Set the default timezone for your schedules (e.g., UTC).
Optionally, configure stack options like tags, permissions, and advanced settings. and click "Next."
Review Details: Review the stack details and ensure everything is correct.
Acknowledge Policies: Acknowledge that CloudFormation will create IAM resources.
Create Stack: Click "Create stack."
Once the CloudFormation stack is created, you need to define the schedules that control when instances are started and stopped.
Navigate to DynamoDB
Go to the DynamoDB service in the AWS Management Console.
Access the Schedule Table
Find the DynamoDB table created by the Instance Scheduler CloudFormation stack (e.g.,
Scheduler-ConfigTable).
Click
on the table name to open it.
Add a New Schedule
Click on "Items" and then "Create item"
Add a new item with the following
attributes.
Name: A unique name for the schedule (e.g., OfficeHours).
Description: A brief description of the schedule.
BeginTime: The start time for the schedule (e.g., 09:00).
EndTime: The end time for the schedule (e.g., 17:00).
Timezone: The timezone for the schedule (e.g., UTC).
Period: The days of the week the schedule applies to (e.g.,
Mon-Fri).
Save the Schedule
Once you have entered the details, save the item.
To apply the schedule to your EC2 instances, you need to tag them appropriately.
Go to the EC2 service in the AWS Management Console.
Select the instances you want to schedule.
Click on "Tags" and then "Manage tags."
Add a tag with the key matching the TagName parameter (e.g., Schedule) and the value matching the TagValue parameter (e.g., OfficeHours).
Save the tags to apply the schedule to the selected instances.
Finally, verify that the scheduler is working as expected.
Check CloudWatch Logs
Navigate to the CloudWatch service in the AWS Management Console.
Go to "Logs" and find the log group created by the Instance Scheduler stack (e.g.,
/aws/lambda/InstanceSchedulerHandler).
Review the logs to ensure the scheduler is starting and stopping instances as
expected.
Observe the state changes of your AWS EC2 instances to confirm they are starting and stopping according to the defined schedule.
Security and Permissions
When setting up AWS Instance Scheduler, it's crucial to consider the security implications and configure permissions accordingly:
1. IAM Permissions: Ensure that the IAM role used by the Instance Scheduler has the necessary permissions to start and stop EC2 instances.
The CloudFormation stack typically creates an IAM role with a managed policy that includes required permissions.
Review and, if necessary, customize the policy to align with your organization's security policies.
2. DynamoDB Table Permissions:
The Instance Scheduler Lambda function requires access to the DynamoDB table containing the schedules.
Ensure that the IAM role associated with the Lambda function has read/write permissions for the table.
3. Optimizing Schedules
To maximize cost savings, consider the following best practices when defining schedules:
4. Non-Production Environments:
Set schedules to ensure that non-production instances (e.g., development, testing) are stopped during off-hours.
5. Multi-Region Support:
If your organization operates in multiple regions, ensure that the schedules are defined per region as needed.
6. Custom Schedules:
You can create multiple schedules to cater to different teams or departments with varying working hours.
1. CloudWatch Metrics:
2. Debugging Logs:
To keep your AWS Instance Scheduler up to date:
While the AWS Instance Scheduler is a powerful tool, consider combining it with other strategies for comprehensive cost management:
Setting up an AWS Instance Scheduler is an excellent step towards automating your EC2 instance management and reducing cloud costs. The above blog has walked you through launching the scheduler, creating schedules, tagging instances, and monitoring the solution. By following these steps, your organization can implement a seamless and automated solution to manage EC2 instance usage effectively. Moreover, combining this with other AWS cost optimization strategies can lead to substantial savings and improved resource management.
Start using Cloudairy to design diagrams, documents, and workflows instantly. Harness AI to brainstorm, plan, and build—all in one platform.
Table of Contents

Introduction
 Manage all your work in one placeCollaborate with your teamUse Cloudairy for FREE—forever


 Related Articles