
Single Sign-On (SSO)
Let your team sign in to Cloudairy with your company identity provider — Microsoft Entra ID, Okta, Google Workspace, OneLogin, Ping, JumpCloud, Keycloak, or any SAML 2.0 provider. People sign in with their work account, and you control access from one place.
You'll find it under Profile menu → Administration → Security → Single sign-on.
Who can set this up: the workspace owner or a workspace admin.
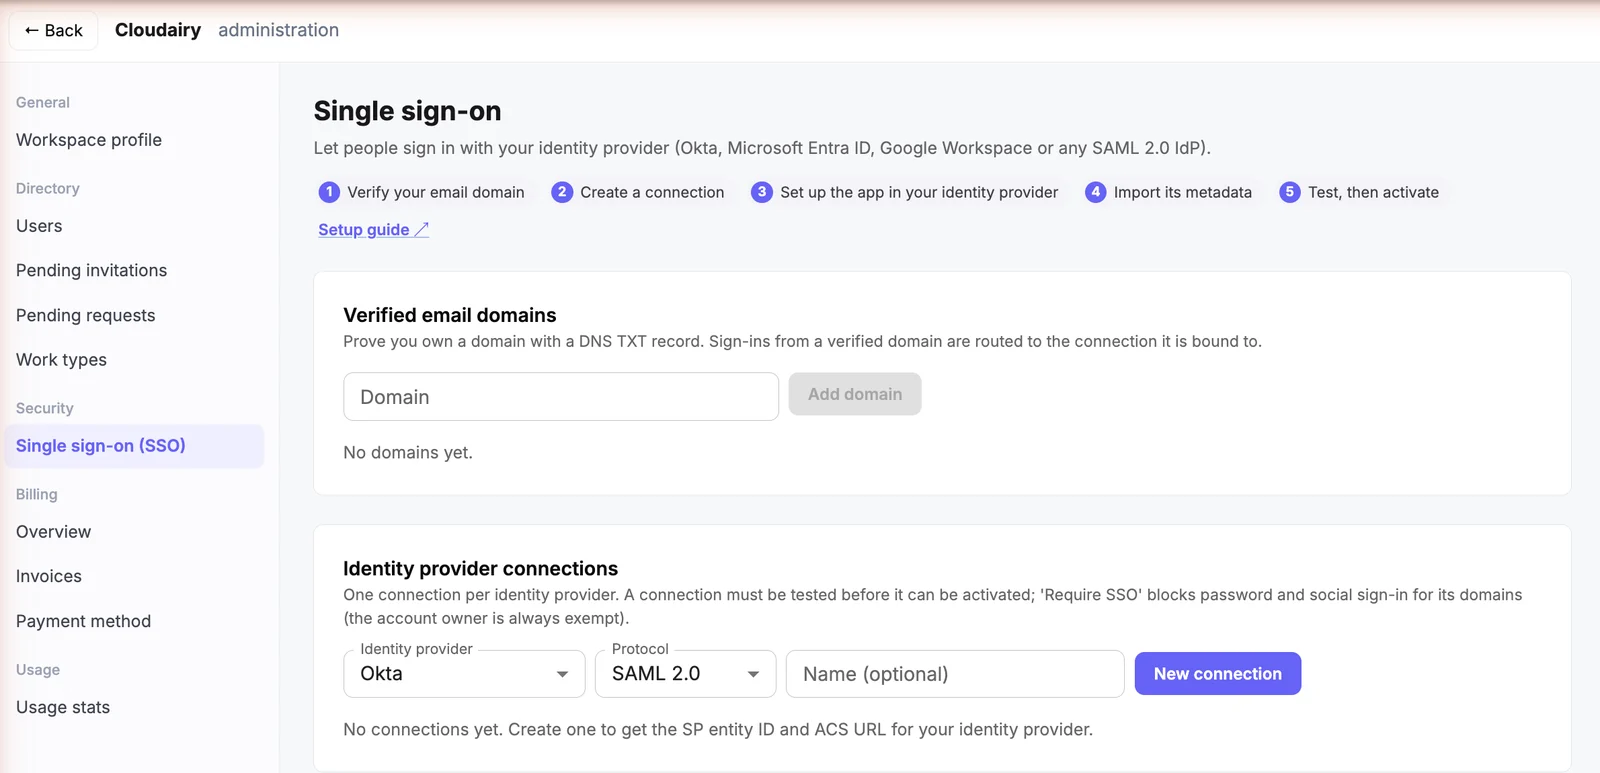
How it works
- Verify your email domain (for example
yourcompany.com) with a DNS record. This proves you own it. - Connect your identity provider by exchanging a few URLs and a certificate.
- Test the connection, then activate it.
- From then on, anyone who enters an email on your verified domain at the Cloudairy sign-in page is sent to your identity provider.
Nothing changes for your team until you activate the connection.
Step 1 — Verify your email domain
- Go to Administration → Single sign-on.
- Under Verified email domains, enter your domain (for example
yourcompany.com) and click Add domain. - Click DNS record. Cloudairy shows a TXT record — a host name and a value.
- Add that TXT record at your DNS provider (Route 53, Cloudflare, GoDaddy…). It does not affect your website or email.
- Back in Cloudairy, click Verify. The domain turns Verified.
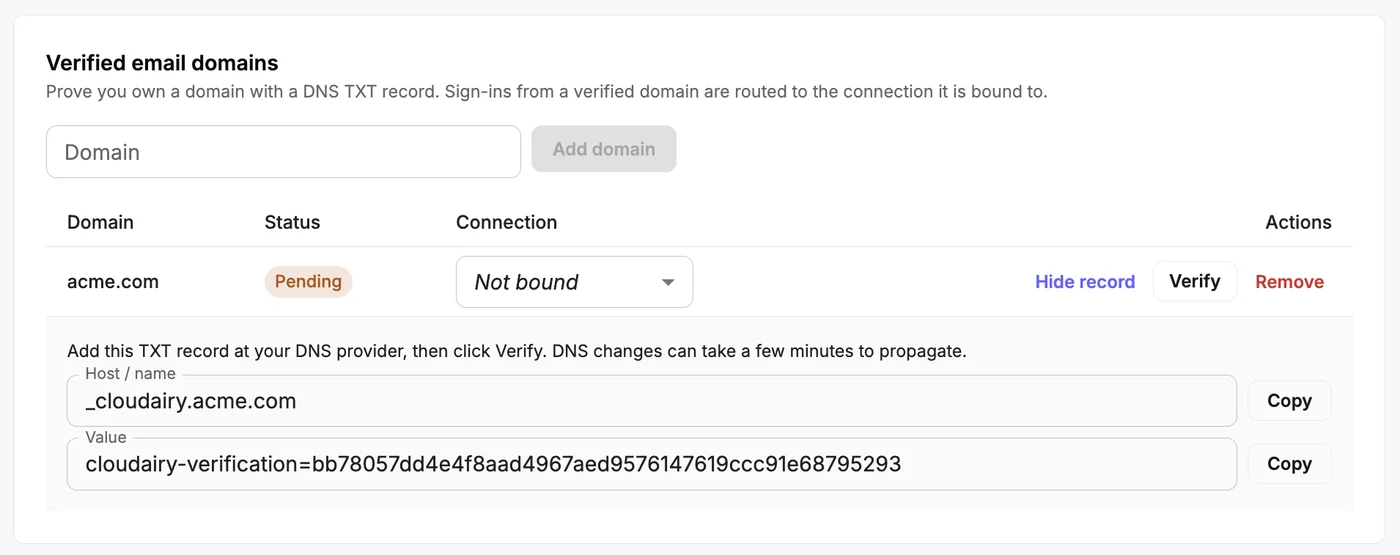
Tip: DNS changes can take a few minutes to appear. If verification fails, wait and click Re-verify.
Step 2 — Create the connection in Cloudairy
- Under Identity provider connections, pick your provider, leave the protocol as SAML 2.0, give it a name, and click New connection.
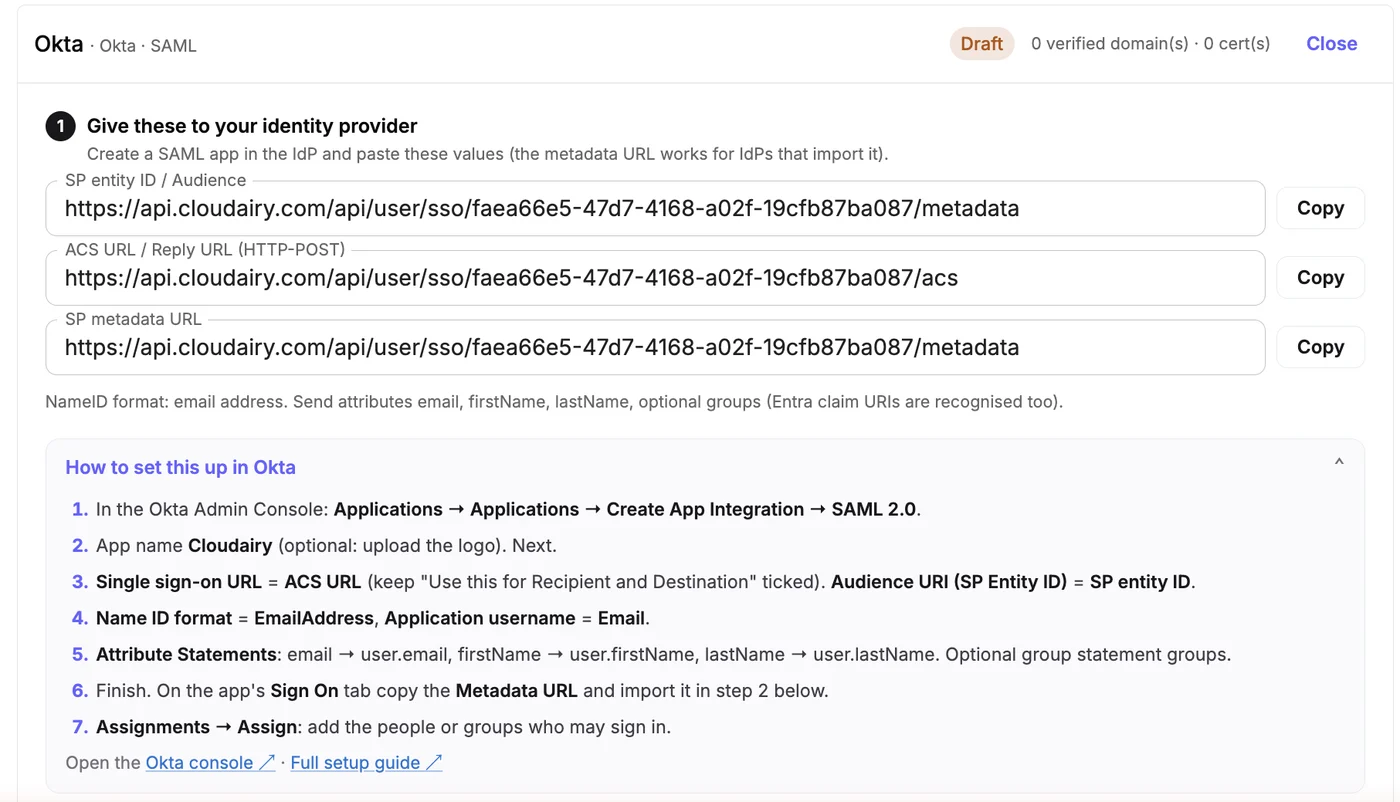
- Cloudairy shows three values to give to your identity provider:
| Cloudairy value | What your identity provider calls it |
|---|---|
| SP entity ID / Audience | Identifier (Entity ID), Audience URI |
| ACS URL / Reply URL | Reply URL, Assertion Consumer Service URL, Single sign-on URL |
| SP metadata URL | Service provider metadata (for providers that can import it) |
Keep this page open — you'll come back to it in Step 4.
Step 3 — Set up your identity provider
Microsoft Entra ID
- In the Microsoft Entra admin center, go to Enterprise applications → New application → Create your own application.
- Name it Cloudairy, choose Integrate any other application you don't find in the gallery (Non-gallery), and click Create.
- Optional but recommended: under Properties, upload the Cloudairy logo and add a description so your team recognises the app in My Apps.
- Open Single sign-on → SAML. In Basic SAML Configuration, click Edit and set:
- Identifier (Entity ID) = Cloudairy's SP entity ID
- Reply URL (ACS URL) = Cloudairy's ACS URL
Then Save. The default claims (email, first name, last name) work as they are.
- In the SAML Certificates section, copy the App Federation Metadata Url.
- Open Users and groups → Add user/group and assign the people (or groups) who should use Cloudairy. Only assigned users can sign in.
Okta
- Applications → Create App Integration → SAML 2.0, name it Cloudairy.
- Single sign-on URL = Cloudairy's ACS URL; Audience URI = Cloudairy's SP entity ID; Name ID format = EmailAddress.
- Add attribute statements
email,firstName,lastNamemapped to the user's email, first and last name. - Finish, then copy the Metadata URL from the app's Sign On tab and assign users.
Google Workspace
- Admin console → Apps → Web and mobile apps → Add app → Add custom SAML app, name it Cloudairy.
- Download the IdP metadata file (or copy the SSO URL and certificate).
- ACS URL = Cloudairy's ACS URL; Entity ID = Cloudairy's SP entity ID; Name ID format = EMAIL.
- Map attributes: First name →
firstName, Last name →lastName, Primary email →email. - Turn the app ON for the right organisational units.
Any other SAML 2.0 provider
Use Cloudairy's SP metadata URL if your provider can import it; otherwise enter the SP entity ID and ACS URL by hand. Send the user's email as the NameID (email format) and, if possible, email, firstName and lastName attributes. The response must be signed (a signed assertion is enough).
Step 4 — Import your provider's details into Cloudairy
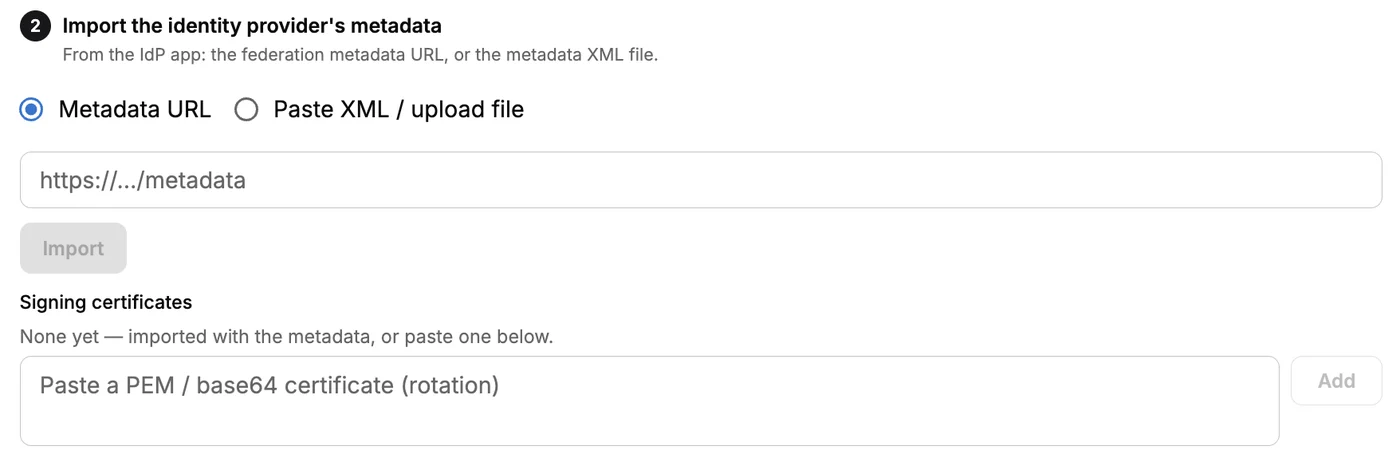
- Back on the Cloudairy connection, under Import the identity provider's metadata:
- paste the provider's metadata URL (must start with
https://) and click Import, or - choose Paste XML / upload file and upload the metadata file.
- paste the provider's metadata URL (must start with
- Cloudairy fills in the provider's entity ID, sign-in URL and signing certificate.
- In the Verified email domains table, set your domain's Connection to this connection.
Step 5 — Choose how people join
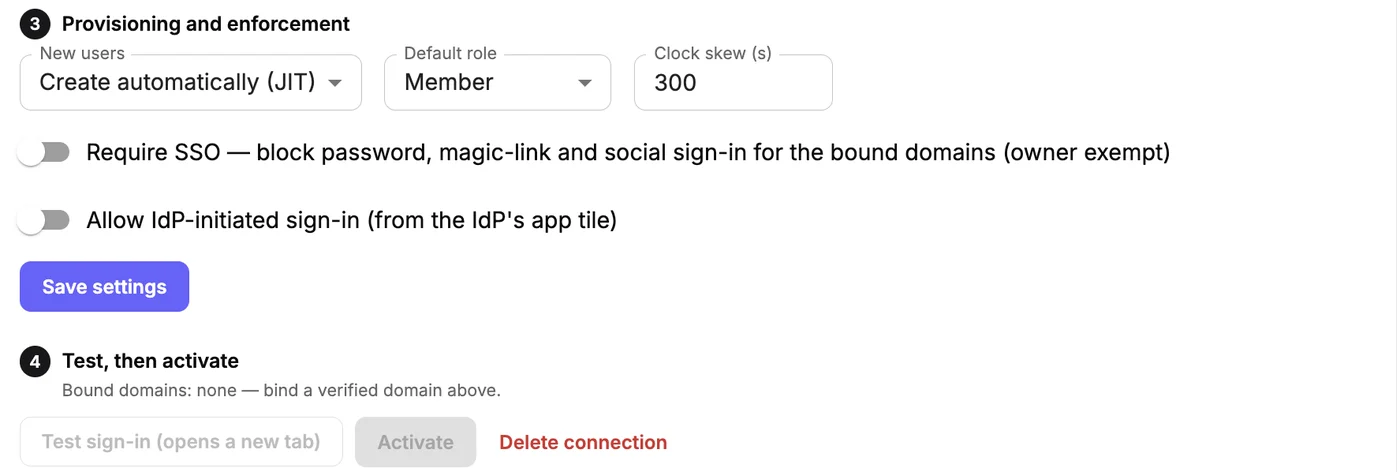
Under Provisioning and enforcement:
| Setting | What it does |
|---|---|
| New users | Create automatically adds people the first time they sign in with SSO. Choose invite-only or off if you'd rather invite everyone yourself. |
| Default role | The workspace role given to people added through SSO (usually Member). |
| Require SSO | Once on, people on your domain can no longer sign in with a password, magic link or Google/Microsoft buttons — only through your identity provider. The account owner is always exempt, so you can never be locked out. |
| Allow IdP-initiated sign-in | Lets people open Cloudairy from the app tile in your identity provider's portal (for example Microsoft My Apps). |
Click Save settings.
Step 6 — Test, then activate
- Click Test sign-in. A new tab opens your identity provider; sign in with an assigned account.
- You should see Test sign-in succeeded. No session is created by a test — it only proves the setup.
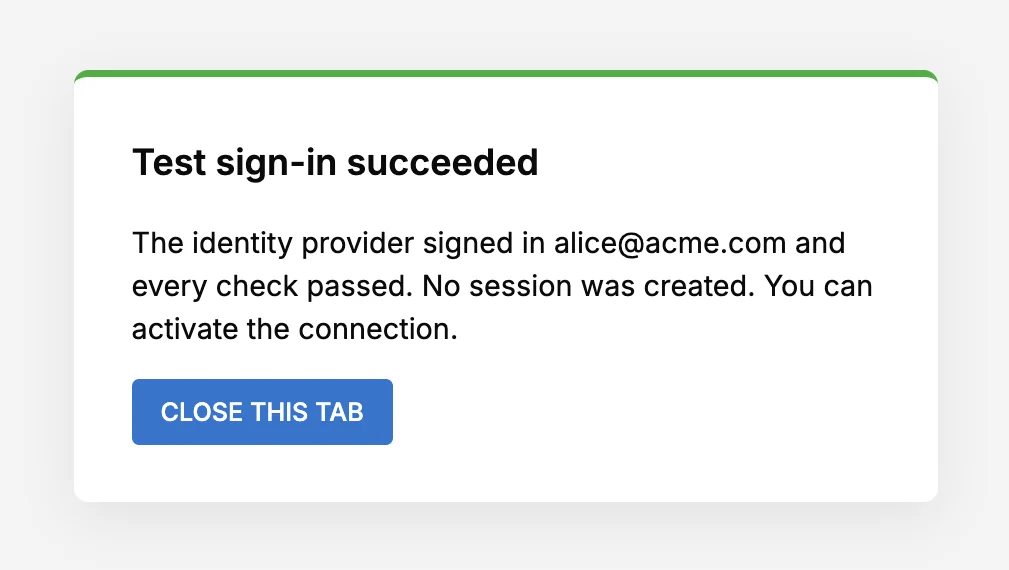
- Click Activate. SSO is now live for your verified domain.
Tip: Turn on Require SSO only after at least one real SSO sign-in has worked.
How your team signs in
- On the Cloudairy sign-in page, click the SSO (key) button.
- Enter your work email and continue.
- You're taken to your company's sign-in page (for example Microsoft), then straight back into Cloudairy.
People can also open Cloudairy from their identity provider's app portal if Allow IdP-initiated sign-in is on.
Automatic user provisioning (SCIM) — optional
If your identity provider supports SCIM 2.0 (Entra, Okta, OneLogin, JumpCloud), it can create, update and deactivate Cloudairy users for you:
- In the connection's Automatic provisioning (SCIM 2.0) section, copy the SCIM base URL and click Generate token. Copy the token straight away — it is shown only once.
- In your identity provider's Provisioning settings, paste the base URL and the token, and turn provisioning on.
- When someone is removed or deactivated in your identity provider, their Cloudairy access is removed automatically.

Troubleshooting
The Recent sign-in events table on the connection shows every attempt and why it failed.
| Message | What to check |
|---|---|
| Your email domain is not a verified domain of this workspace's SSO connection | The person's email domain isn't verified, or the domain isn't bound to this connection (Step 1 and Step 4). |
| The identity provider's response was not signed with a certificate this workspace trusts | The provider's certificate changed or wasn't imported. Re-import the metadata. |
| The response was issued for a different service provider | The Identifier / Entity ID in your provider doesn't exactly match Cloudairy's SP entity ID. |
| The identity provider's response has expired | The clocks are out of sync. Try again; if it keeps happening, increase Clock skew. |
| You do not have a Cloudairy account in this workspace and automatic provisioning is off | Invite the person, or set New users to Create automatically. |
| Your access to this workspace has been removed | The person was deactivated in your identity provider (SCIM) or removed from the workspace. |
| SSO login is enabled for this domain. Please use SSO to log in. | Require SSO is on — use the SSO (key) button on the sign-in page. |
Turning SSO off
Open the connection and click Disable. Your team can sign in with passwords again straight away (Require SSO turns off with it). Delete connection removes it completely; your verified domains stay verified.
For more help, see Support & Help.